Every few months I organize a hack day at the office, usually on a Saturday. This past Saturday we had our 5th installment of hack/make/tinker day at meltmedia and the turnout was great! Attendance was 8, up from 3 the last time around. YESSS!
Electronics and Hack Workbench
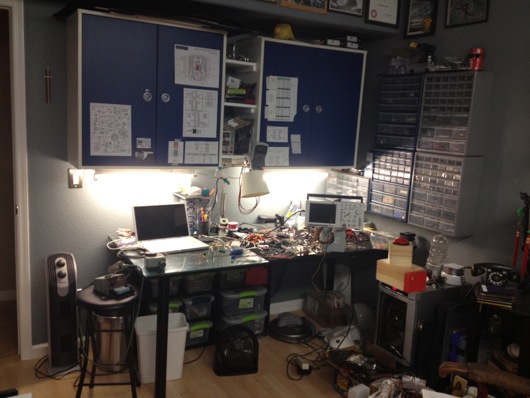
I've had a number of requests from readers to see my workbench in its entirety, as most photos of it are just backgrounds to projects. So, I thought I'd post some photos and explanations in an article. Maybe someone will get some helpful hints or perhaps someone will lend me some helpful advice. First off, here are some wide shots of the mess:
I made the table. The top is made out of three 10"-ish wide pine boards glued together side to side using biscuits. I had a custom piece of 3/16" glass to fit the top. Half of the top of the table is covered with conductive foam to keep static at bay. I ordered a couple big pieces of that from somewhere on-line, can't remember where. It's super convenient for stabbing parts into to hold them neatly. It's also great for discharging static. The legs I've had a while. They were part of a giant desk I built years ago. I got them on-line many moons ago. They have bases that are screwed to the bottom of the tabletop. They then screw into the bases. They're made of steel or aluminum or something strong like that. Under the tabletop, I put a big "X" of 3" wide interlocked pine planks for rigidity. I can stand right on the center of that table and it barely flexes.
Down below the desktop is a six-cubbyhole shelf on little rubber footies leftover from my table saw stand (that is now attached to a rolling platform I made). In each of those cubbies, I put plastic lock-top containers full of various larger items, like wall warts, scavenged PCBs from VCS and such, and cords. This is a great use of space that would otherwise be cluttered up with piles of things.
The blue cabinets came with the house. As with most of the light fixtures and some other miscellaneous pieces left behind by the previous owners, I'm guessing they're from Ikea. They're really handy. I added the little white shelves between the two cabinets. I have a benchtop digital power supply on the lowest shelf for easy access, but that's not my main power source. I'll get to that shortly.
I taped up a bunch of my most-referenced cheatsheets for things like pinouts on ATmega328's, ATtiny13's, common capacitor markings, resistor bands, ISP cables, etc. I also keep my DMM hanging right there and made a little wire hook for the leads.
The parts drawer cabinets on the right of the bench are typical types from Home Depot or Lowes. The more the merrier, as you can see. I keep groups of similar things close together. Eventually, there will be more of these. However, I have to get more creative with my space. To the right of the cabinets is a big painting that I commissioned for my Man Cave™ that I'd prefer not to move.
In some of the larger drawers, I use the conductive foam to hold my many ICs in layers to save space and for organization. I label each group with my handy Brother P-Touch labeler, like so:
Here's another angle on how I stack the ICs in the larger drawers:
I then put an index label on the front of the drawers so I can easily find families of ICs. I haven't yet found a really cool method for storing the 8 zillion resistors I have, but I do sort them by sub-1,000Ω, 1KΩm and 1MΩ drawers. Miscellaneous electrolytic caps are in one big drawer, common caps that are still in their tape from the manufacturer are generally sorted into smaller drawers.
I label the fronts of the drawers sometimes, especially when the drawer is clearly something that will always contain what it currently contains. In the case of my stacks of DIPs and whatnot, they very well organized.
I have so many parts, now, that I have built a spreadsheet to track them. A majority of the parts I have I've thrown on the end of orders because the parts looked cool or handy. When a grab bag of common transistors will only add a couple of dollars to an order, why not? AVRs are my favorite microcontroller, so I have a drawer dedicated to various renditions of that family of chip, as you can see on the middle left drawer above.
I don't know if people notice this in the background or in screenshots, but I use a 15" MacBook Pro for my benchtop computer. The battery failed, so it's always plugged into AC, now. It's now a flip-open desktop workstation, pretty much. I use this MacBook Pro to program microcontrollers and to have convenient access to the web and what not.
Our house is all Mac all the time. I have a Dell box used as a network storage server, but that's it. My regular desktop is a big-arse 27" 3.4 GHz iMac with a second 27" Cinema Display. Both are on wall-mount arms which are supposed to make my desk cleaner. However, as you can see in the photo below, all that's done is make more room for me to pile parts.
Of course, what desk area would be complete with a jackalope and an oil painting of a monkey in a fez?
About my primary power supply... I took apart a my wife's old computer that she had when we met. It was a sad, sad old computer I'd given her to get her by that I think I salvaged from my uncle's office. The power supply makes for a fantastic DC power supply. It provides very clean and reliable 3.3VDC/14A, 5VDC/22A, and 12VDC/10A power. This was crucial when I was working with peltier devices, which drew more amperage at their ideal voltages than the digital power supply could give them. This Dell power supply doesn't even break a sweat when a peltier device asks for 3.5A. The max on my digital PS is only a little shy of 3A.
I turn the supply on or off using this little toggle switch I rigged into the main jumper for the power supply.When I become ambitious about really finishing organizing my bench, I will snip all the extra wires and connectors and clean up the power supply. I'm also going to extend the voltage and ground leads and put nice ends on them to make it easier to connect and disconnect them from my many breadboards. Speaking of...
I whipped together this little adapter so that I could quickly connect and disconnect the various voltage leads from the power supply to my breadboards. I quickly got tired of screwing and unscrewing the thumbscrews on the breadboards when I wanted to switch them out. Eventually, these connectors will be on-the-ready toward the back of the benchtop and the switch for the power supply will be mounted more conveniently. The power supply will be relocated up and out of the way. Right now, sadly, it sits on two pieces of wood on the ESD foam.
When I work with my favorite microcontrollers, the AVR series from Atmel, I don't usually use a proper Arduino board, even though I tend to use the Arduino IDE. Instead, I whip together a quick circuit with either a 16 MHz or 20 MHz quartz crystal on a breadboard. I usually have three or so of these setup and ready to tinker with. I do actually have a few different types of Arduinos I've purchased with gift cards, recently. Here's an example of a typical setup for me:
I followed the recommendations from the ATmega328 datasheet for what components to put around it. There's a 10µH inductor on the analog voltage reference pin (in the photo above, it's on the Vcc pin, so ignore that). There's a 20 MHz quartz crystal on the XTAL1 and XTAL2 pins. Each of those pins is also connected to ground with 20 pF capacitors. Often times, I put a 7805 5V linear regulator on the + rails of ones side of the board and the other has either a 7812 12V regulator or LM10863V3 3.3V regulator on it. Of course, the proper capacitors near the regulators to clean up power are usually on there, as well. Don't forget the polarity diode so that you don't accidentally hook up the power supply leads backwards and cook something or popcorn an electrolytic capacitor.
As you can see from some of the above pictures and the one below, the edge closer to where I work on the glass surface gets cluttered with the parts I reuse the most.
About once every few months, I will clean up the area and put things back where they belong.
I keep my notes and diagrams and doodles in these awesome little Field Notes® brand notebooks with graph paper inside. They're about $10 for a 3-pack and each notebook has 48 pages in it. They're the perfect size to sit on the bench next to a project. Not so big that they require a lot of open space. Not so small that they're just not useful.
Last, but not least, I present my bourbon cabinet, complete with my hand-dipped (by me at the distillery) Maker's Mark® bottles. I have in my collection about 20 different bourbons. My goto at when we're out and about, of course, is Maker's Mark®. :)
That's it for the tour. If any of you have suggestions or comments, please, please leave them below in the comments section. I'd especially love to hear how you guys are storing your resistors. The ultimate trick still eludes me. I don't want to waste a little drawer for a single value, of course. Dividing up the drawers makes it too time-consuming to get one. I'm thinking along the lines of a Rol-O-Dex of resistors or something. I dunno. Comment away.
Focus, Dammit! Or, How I've Learned to Control A.D.D.
My favorite shirt reads, “They say I have A.D.D., but they just don’t understand. Oh, look! A chicken!” My sister holds a Master’s degree in child counseling and she is absolutely certain that I would have been diagnosed with A.D.D. when I was a child. Maybe one reason I was not diagnosed can be summed up in this sentence from an article on the PsychCentral.com website: “[A.D.D.] also may go unnoticed because the ‘inattentive daydreamer’ may be overlooked...” Yep. That’s me summed up in two words: Inattentive daydreamer. Focus is something I’ve struggled with all of my life. I remember when I was in the 2nd grade, working through questions in a workbook one minute, then the next minute I’m taking apart a ballpoint pen and fiddling with the parts and NOT getting my workbook work finished. If I wasn’t taking apart things I found in my desk, I was doodling between small bouts of actual work. To my point, I’m supposed to be gathering my notes and thoughts for a meeting in about 8 minutes as I write this, yet I sit here writing an article about focus. Is this multitasking? No, this is not keeping focus on what is needed right now.
[Insert long pause while I scramble to gather my notes and thoughts and attend a meeting...]
According to an article on the ADDA website, “4.4% of adults in the United States meet the criteria for having Attention-Deficit Hyperactivity Disorder.” OK, that's not a tremendous number. Though, it IS the number of ADULTS that could be considered to be afflicted. According to the U.S. Census Bureau, as of 2010 there are over 30 million adults in the U.S. (those 18 or older). Roughly 1.3 million (more than 1 in 30) adults could qualify as having A.D.D. You probably know one. That means there are at least two of us here at Meltmedia (and maybe half of one more person, somewhere here)!
Obviously, whether it’s A.D.D. or just a simple lack of interest in the task at hand, if you’re not fully engaged in what you’re supposed to be doing, you’re not being as productive as you could be. I have met people who are simply task-oriented and will do something from start to finish like a robot, engaged or not. They don't count in this conversation. I know it seems completely obvious when you read it, but it’s very difficult to complete any task effectively if you’re not engaged in the subject. If you’re not engaged in the subject, you’re not as productive as you could be.
Where Does the Focus Go?
One of my biggest problems seems to be that when a project or task is no longer challenging to me, I’m done with it, completed or not. Historical case in point: When I was a kiddo, I had a Teddy bear with a wind-up music box. I was fascinated by the lump inside of Teddy that appeared to make the music. Once I tore apart poor Teddy and figured out how the music box made music, I lost interest in my Teddy bear. I did carry around the music box for a while, likely because it was shiny and mechanical. Sure, Teddy wasn't a project, but I think it shows that the challenge or magic needs to be there for me to focus on something.
A more modern case for me: I took on a fairly large project for a client when I was doing the freelance development thing years ago. It was a brand new hospital way north of where I lived in Michigan. I was writing a Java application that gathered time card data from a number of punch clocks around the hospital and translated it into something the hospital accounting software could consume. This was not a small task by any stretch. It involved building a Linux server, writing a user-friendly client-side Java application, and writing a server-side Java application. For a one-man development group, it was a lot to do. Being the master of focusness that I was, of course, I found other more interesting things to do much of the time that I was supposed to be doing Java programming for the hospital project. About 5 days prior to the due date for initial testing of the entire system, I realized that my unfocusness had gotten in the way and caused me to have to work on 3 hours of sleep each night to get it working in time. Bitten for the 5,622nd time in my life, at that point. Really?! How many more times will it take???
As I’ve gotten older, I’ve noticed that part of my challenge/interest problem is that I also lose vision of the goal of the task. In many cases, I lose track of the reward for completing a task, whether the reward is a pat on the back or money or knowing that I’ve made the world a better place for someone. Figuring out how to solve the problem has typically been more important to me than the result that comes from solving it. For instance, around my middle school years, I used to be excited about the idea of building games for my Atari 400 computer. However, once I figured out how to program the little ships to move, how to generate laser sounds, and how to read the position of the joystick, I lost interest because the magic went away. An even more important fact wash that I completely forgot about the result I was originally looking for: I wanted a cool game that I wrote myself that others would enjoy playing. Maybe I wanted a little fame, as well, but this article is about focus, not visions of grandeur. Wait. That sentence would be funnier if I changed out, “grandeur” with a word from the Thesaurus. How about this? Maybe I wanted a little fame, as well, but this article is about focus, not visions of resplendence. No! Even better: Pomp! That word is funny to me. Pomp. Focus, dammit!
How Do I Focus Today?
Nowadays, to combat my lack of focus, I try to remember all the issues I had in the past with not following through on plans. I always keep in mind that people are counting on me and that when I produce completed results for them, I am rewarded. Not only does it feel great to complete a project, but it’s highly unlikely that I will be fired for being reliable and thorough! Winner, winner! Chicken dinner! Toothpicks are thinner! Hat with a spinner! FOCUS!!!
Fear
I believe that in some ways you can tie the drive to be focused, effective, and thorough to fear. Sometimes, nothing drives me to the finish line like a crazed guy with a shotgun chasing me. No, that never happens. Wrong kind of fear... Fear of disappointment drives me to the finish line. I believe that, to me, the fear of disappointment is greater than the fear of failure. I have failed plenty. Big deal. Get up, dust yourself off, go at it again. However, the fear of disappointment is quite a powerful motivator because we generally want to help one another.
Fuel
Another thing that helps me stay focused is food. Oh! Caffeine. OK, mostly food, but large doses of caffeine in the form of a large 4-shot latte certainly helps, too. The energy from breakfast goes a long way to keep your brain sharp. I am most creative in the morning after I’ve eaten or WAY late at night, after my brain has had all day to get loosened up. If I continue to fuel myself smartly, I can be creative all day. Your mileage may vary.
Clean Environment
I’ve learned that my train of thought only needs the slightest distraction to jump the track. A shiny object, a sound that shouldn’t be there, or even a random idea about some other project I’m working on are all ways to be distracted from the task at hand. Keeping my environment quiet and clear of distraction is key. HOWEVER (very important), I DO recommend keeping a Rubik’s Cube® or a doodle pad or Playdoh® nearby. When my brain does wander, having a familiar distraction lets it vent, then get back on track.
Deadlines
Deadlines. I work very well under pressure, but that’s not a very healthy way to work. Dr. Oz says that adrenaline and stress cause spikes in cortisol which leads to belly fat. Hmmm... Are the creators of deadlines causing the surge in obesity in the U.S.? Focus. Sadly, deadlines are a fact of life, especially in this information-overloaded society we live in today. Everyone wants something yesterday. Have you noticed that everyone tends to want something BIG yesterday? So, it’s not just me? Anyhoo... Focus is enhanced in me by deadlines. I’m not necessarily recommending procrastination as a means to create artificial deadlines, of course. If you do a little Googling, you’ll see that they do tend to help with focus. They work for me, as much as I hate them.
Technology
Technology is a great way to help focus. To-do list applications and calendars are lifesavers for me, and I’m not talking about the delicious roll candy, either, although I sure do love me some sweets, especially the cherry-flavored ones.... FOCUS. My brain is firing on 10-1/2 cylinders most of the time. 78.4% of the time, it’s firing because of useless thoughts. But, for the 21.6% of the time that it’s doing something meaningful, only about 1.6% of that time is spent trying to remember things. If you’ve been following at home, you realize that the math above shows that my brain sucks at remembering things. That leads us back around to the reason I started this paragraph: To-do lists and calendars. Use them. I also make heavy use of Trello.com, an on-line (and iPhone app) kanban board. Slick. Easy. Effective.
Clear Your Mind
To expand on the cube and dough idea above, I recommend simply getting up from your chair and wandering around occasionally to clear your mind. I’m a firm believer in the whole “forest for the trees” mantra: If you stare at the forest too long, you will start to lose vision of the trees. Clearing your head inevitably leads to freshening your vision. You may see something after you return from your break that you missed prior to departure.
At this point, we’re beyond the 1,500-word mark, FYI. You’re still with me, yes? If not, put down the Rubik’s Cube®. We’re almost finished.
Oxygen Is Good
Breathe. It goes great with food and caffeine and is arguably one of the most important things you’ll do all day. Seriously, taking a few deep breaths once in a while really does help you to stay focused. It feels great, too! I like the way a deep breath sometimes makes my chest plate crackle. It’s like cracking your knuckles without using your hands. Did you know that the cracking sound in your knuckles is caused by popping gas bubbles? Crazy. Focus.
Review, Review, Review
Review your to-do list (or lists) regularly. The more you see things, the more they stick at the front of your mind. I keep my Trello board open on my laptop monitor, which sits to the left of my big-honing main monitor. I see my ideas and items to be done all day long and it really does help me to stay on top of things. They all stare at me all... Day... Long... Staring. Poking. Taunting. They’re like little blinky LEDs, flashing in the corner of my eye, grabbing my attention. What was that about keeping my environment clear? Focus.
I realize after looking at the little word counter thing in the status bar down there in Pages over here that I’ve crossed the border into 1,700 Words Land (it’s north of 1,600 Words Land, if you’re looking for it on a map). I think I’ve given you some good starting points on how to enhance your focusness. Yes, it’s a word. To me. If you Google a little, there are zillions of blog entries and articles on ways to keep your focus. There are many silly tips, as well, but you’ll see patterns repeating. When you distill them down to a handful that you find useful, practice them. Really start to use them in earnest. Or, if you prefer, in Bert.
Addendum: I'm reading, "Imagine: How Creativity Works" by Jonah Lehrer. It's a fantastic read and addresses in places the affect of ADHD and ADD on creativity and accomplishment. In summary, studies are finding that overly focusing can inhibit creativity and innovation. Read the book. Embrace your lack of focus!
Mac OS X Lion and iSCSI Using FreeNAS and globalSAN
Yikes, that title was a mouthful, but I wanted to make sure the search robots gobbled it up with their mouths so that people in my situation would find this article. Short attention span version: I can't seem to get Mac OS X Lion to connect to my FreeNAS iSCSI drives. Lemme essplain what I have and what I am trying to do. In a later update or another article, I will explain how I (hopefully) eventually got this working.
Medium attention span version: This whole exercise was due to my Promise Technologies NS4300N chassis failing to function with Lion. I first noticed it when, after I had upgraded to Lion, my iTunes was pitching a fit about not being able to connect to my music library. Meh. After some research, I found that 1) Promise end-of-lifed the NS4300N; 2) Lion broke the Apple File Sharing (AFS) feature of the device. I'd like to kick someone square in the _ _ _ _ _ for this, but I figgered there was a solution somewhere to solve my storage dilema.
UPDATE: (Slightly more than medium attention span): I used globalSAN from Studio Network Solutions to get Lion going as an initiator for iSCSI. I was able to get the globalSAN thingy to connect and seeminly stay connected to the FreeNAS drives, but once I tried to partition the disks, DiskUtility hung up solidly. I was never able to unmount or do anything to the drives at all. So, apparently, we're still waiting on an update to globalSAN. I have confirmed that nothing is available as of August 2 by reading the forums at SNS. They have acknowledged the issue, but hav not yet updated the product. It is FREE, so I'll be patient.
There's a simple and fully Open Source solution for network attached storage (NAS) that I was not aware of until our genius IT guy ("Drew") opened my eyes this week. You see, I used to be a network engineer and I've lost touch with the latest neatnessisms of the industry. Whether you're a Mac dweeb, Windows dork, or Linux chowderhead, you can build an inexpensive NAS box yourself for not much coin, especially if you have extry parts and computers lying around. Instead of going out and purchasing a $500 NAS chassis like I did a year or two ago, you can take that leftover 2.4 GHz Dell sitting under your desk and make it a useful device again. My Dell used to be a fairly cutting-edge video editing system, but as of late it has turned into an under-the-desk Dust Bunny Collection Unit (DBCU).
Get yourself some cheap SATA drives. Pricewatch.com has 1 TB SATA drives listed as low as $49 now! Nutty, I tell you! I picked up a 4-port craptastic little Sabrent SATA RAID controller for $29 at Fry's Electronics (because I was to impatient to buy one on-line). Don't use the RAID capabilities on the card (in hardware), as FreeNAS will do all this for you and needs to be able to control error handling itself. If you let the hardware do it, FreeNAS won't ever see problems until it's too late. And, to be fair, the controller works perfectly well. I say, "craptastic," because it's a typical Chinese product: The quality isn't the greatest and the language in the help screens is hilarious. "Please wait for seconds for low-level format to be finish." I'm paraphrasing, of course.
I gutted my Dell Dimension 2400 (circa 2004 or 2005), threw the SATA controller and four spare SATA drives I had in a drawer (a 1 TB, a 750 GB, and two 500 GB drives). I also connected a spare EIDE drive and a CD-ROM to the primary connector on the motherboard for booting and to get the initial installation completed.
Next step, after making sure the BIOS saw all the drives and that everything about the hardware was kosher, I downloaded FreeNAS from http://freenas.org and burned the ISO image to a CD. The first burn produced a non-bootable CD, just like the directions suggested a high-speed burn might, so I burned at only 8X (slowest I could) and that CD worked perfectly. Follow the installation and setup instructions on the FreeNAS website.
As I said above, it doesn't function in Lion. Yeah, thanks, Apple. On a positive note, the FreeNAS server is up and running and appears to be functioning completely normally. It was soooooo easy to install. Pop a CD in, a couple of keystrokes, and viola! Configuring it for iSCSI took a little bit longer, but wasn't difficult at all. I HIGHLY recommend you read up on the terms of iSCSI before configuring. It helps with understanding of the system and makes the configuration that much simpler.
I will report more as I get this functioning.
And here is another UPDATE: I found a link to instructions on how to get the AFP stuff back to a state like it was in Snow Leopard so that you can at least listen to your iTunes music that is stored on your external NAS. Directions are here and I was able to make it work.
My First Amplifier Circuit: LM386 Easy Amp
It's no secret that if you read at least two articles on this blog you know that I know just slightly more than diddly-poo about electronics. That's OK, though! I'm learning and it's WAY fun! It's like making cool stuff with Legos™ but with the caveat that you could electrocute yourself or start a fire. The other day, I tore down an RCA radio and CD alarm clock that my wife had owned for a while. Its LCD display was failing. We didn't really have a used for it, so I took it apart. I got a great collection of little tactile buttons and motors and other cool circuit boards full of capacitors and diodes and whatnot. But, two of the coolest parts I got were a couple of pretty beefy but small 8-ohm speakers with really great range. They sound awesome when hooked up to something that can drive them properly.
I decided to build a quick amplifier circuit around the LM386 amplifier IC. It's an 8-pin DIP and it is really easy to get going if you're past the super-newbie stage. Or, at least if you are me. I fried two of these in the very early stages of my electronics experimentations. That's an accomplishment, since the versions I have of this IC can withstand up to 15VDC or 18VDC (I can't remember what the National Semi datasheet said). I was young and stupid and needed the lesson.
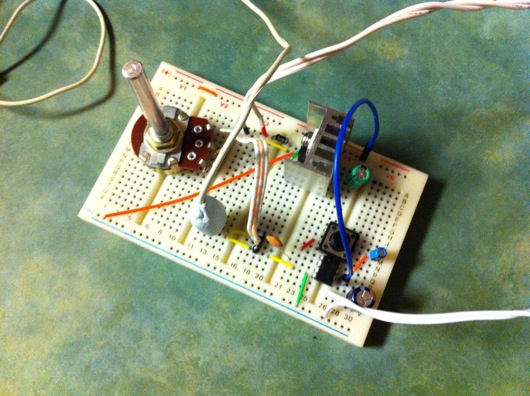
Here is the breadboard of the circuit...
The potentiometer is the volume control. The heatsink is screwed to an LM7812 12V voltage regulator. There are a couple of caps and a diode on there. The wire with what looks like gum on the end of it is actually the headphones jack wire with a three-pin header molded onto the end using that really cool putty "as seen on TV" that you knead together and it forms really hard parts. I used it to protect the super-thin wires of the headphones jack. The little chip on that board is the LM386. The red- and black-tipped wires coming into the top of the breadboard just left of the diode and the voltage regulator are the leads from a Radio Shack 12V, 500 mA wall wart.
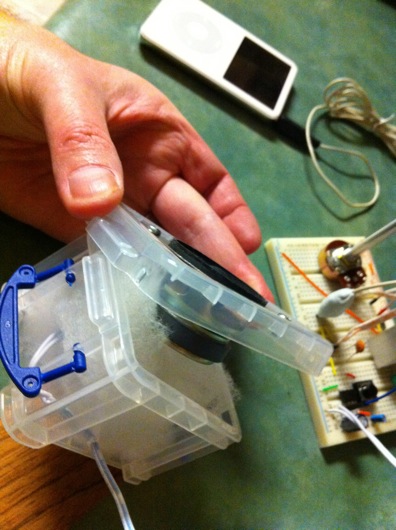
I salvaged some really impressive little powerful speakers from an RCA clock radio and then made a quick little cabinet for one of them in a plastic parts container I had on my workbench. I used the batting that was behind the speakers in the radio, as well:
It was sufficient enough to make the speaker sound much better while testing. Of course, if I build a proper iPod speaker set, I'll do a better little fun cabinet for each speaker AND I'll proper match the iPod's kinda-non-standard line-out voltages.
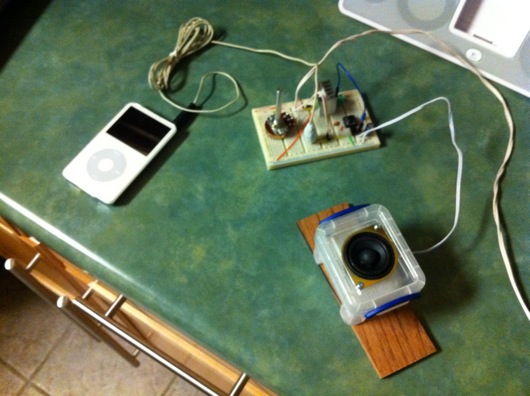
Here is the entire 12V circuit connected to an iPod:
When I pressed the little plastic speaker box against the kitchen counter more tightly, the bass was impressive. So, it seems a well thought-out speaker cabinet for these speakers could potentially make a really nice portable little speaker system. I can't remember what the wattage listed on the back of the speakers was, but it wasn't shabby. I have a number of sets of really nice small speakers I've purchased over the past couple of years for future speaker projects. They've all got pretty decent response. These little guys were lucky finds in a salvage project, so yay!
As I wirte this, I am not at my MacBook on my electronics bench, so the exact circuit diagram escapes me. Here is one that I think is VERY similar and would probably work well:
What happens when a fat guy on a golf cart parks on my iPhone?
Here is what a fat man on a golf cart (who apparently doesn't look in front of him while he drives) can do to your iPhone 3Gs that accidentally fell off your golf cart at the previous hole:

For those who have weak constitutions, turn away... Oops. Too late. Sorry.
Short story: One day I went golfing with my best friend. I used my iPhone 3Gs as a golf GPS. At the tee on hole number 3, it fell off our golf cart and landed face down on the side of the cart path. While we were playing the short game on hole 3 (up near the green), a fat guy in a hurry rolled up to the tee box and parked his fat ass and his golf cart on top of my iPhone. The end.
$199 later at the local Apple Store, I had a brand-spanking new iPhone 3Gs with not a single scratch on it. Yay (kinda)!
