Objective-C/iOS/iPhone: UIColor from NSString

Until I find a home for my little snippets of code, here is where they will go. While building an iOS (iPhone) application, I needed a quick little method in Objective-c that would take strings of color codes from data provided by web developer peeps and convert those string values into UIColor objects. For instance, sometimes we'd get "#ff7401" from the data for our app. Sometimes it might be formatted like, "0xff7401" or even just, "ff7401". I simply created a category on NSString to make is super-simple.

NSString+meltutils.h

[code lang="objc"]

//  UIColor+meltutils.h

//  Created by Andy Frey on 10/15/10.

#import <Foundation/Foundation.h>

@interface NSString (meltutils)

- (UIColor *)toUIColor;

@end

[/code]

NSString+meltutils.m

[code lang="objc"]

#import "NSString+meltutils.h"

@implementation NSString (meltutils)

- (UIColor *)toUIColor {

unsigned int c;

if ([self characterAtIndex:0] == '#') {

[[NSScanner scannerWithString:[self substringFromIndex:1]] scanHexInt:&c];

} else {

[[NSScanner scannerWithString:self] scanHexInt:&c];

}

return [UIColor colorWithRed:((c & 0xff0000) >> 16)/255.0 green:((c & 0xff00) >> 8)/255.0 blue:(c & 0xff)/255.0 alpha:1.0];

}

@end

[/code]

So, to use this, all you have to do is import the header file and send a message to your string that contains the color code:

[code lang="objc"] #import "NSString+meltutils.h" ... UIColor *c = [@"#ff840a" toUIColor]; ... [/code]

Hope that helps someone out a little!

My Very Own Useless Machine Ever!!! (Finally!)

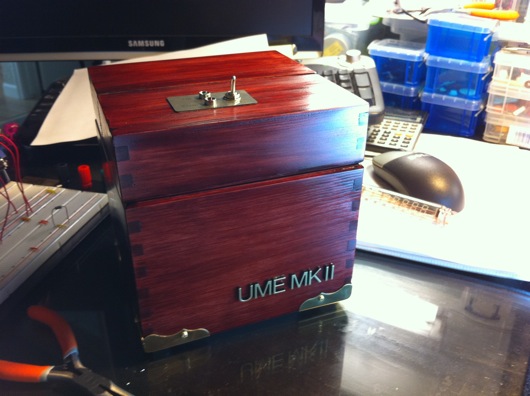
I finally finished my own UME Mark II for my own desk for me! Woohoo! My flavor of useless machines ever has a "presidential" look, as some have put it. Latest UME Mk II

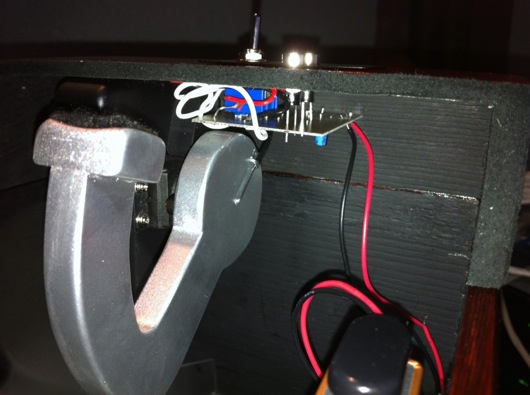
This latest model is the first version of the UME Mk II that incorporates a small PCB (printed circuit board) underneath the lid that is attached directly to the pins of the On/Off switch and the two LEDs. It has all the discrete components required to drive the modified servo. It saves time in soldering and it tidies up the wiring under the hood of this magnificent machine.

UME Mk II PCB v1

The wiring that is there comes from the servo, the "parking" switch, and the battery. The next machine I make will have slightly better placement of the board relative to the arm. The clearance was a little tight for my taste, but it still turned out great. This first version of the integrated PCB required some hand-tweaking. I had to cut a couple traces, solder a couple of jumper wires, and notch a little corner out of the board to allow clearance for the parking switch.

The parking switch is the little microswitch inside the box that the arm trips when it retracts back into the box. Its purpose is to cut power on the back swing of the arm. When you flip the On/Off switch to On on the top of the machine, you give power to the circuit and the arm releases the parking switch. When the arm moves the On/Off switch to Off, it actually reverses its own direction. It then heads back into the box until it presses the parking switch, which cuts off power again.

UME Mk II PCB Diagram

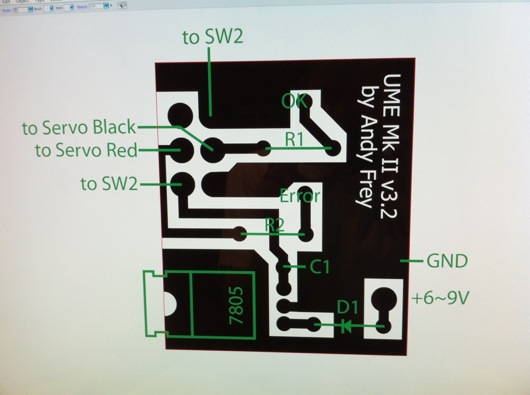
The "3.2" version number is truthful: I revised that silly drawing about 3.2 times. The one above is the latest that incorporates the cuts in the traces I had to make on my machine's PCB. It also takes into account the trimming I did in one corner of the board. In the diagram, I just trimmed the entire edge so that it was still rectangular and easier to cut out.

Everywhere you see black is where there would be copper left on the PCB when etching is completed. The green lines and labels are there for reference but are not printed on the final PCB. The white lettering in the black gets etched out of the copper on the PCB. The little circles at the ends of the traces and a few other places in the black areas are drilled with little bits under my drill press. The final PCB turns out nicely, for a home-brew board, I think.

Office Chair Land Speed Record?

I had the very excellent opportunity to take the Office Chairiot™ into an empty office suite in our building this afternoon. It was not the adrenaline rush that I used to get skydiving, but it definitely ranked up there. Danger factor was high, since the office chair has almost zero controllability. I might as well have been riding on a giant hockey puck gliding around on a giant hockey rink. The office suite is actually several that are all wide open. It was a lot like a roller skating arena, only a little smaller. There was a lot of construction dust on the cement floor, but the cement was smooth as silk for the little wheels on the office chair. The wheels on the motor unit are rubber and standard-sized scooter chair size, so they can go semi-all-terrain.

I lined up the Office Chairiot™ in one far corner and pushed the throttle of the speed controller to full. Using the occasional (and as little as possible to stay safe) toe touch to the floor to keep the office chair lined up behind the speedy little motor unit, I just let the motor get up to full speed. I was going fast enough to kick up dust behind me. I left it wide open until about 20 feet before impact of the wall. One of the walls I drove toward in one direction was a street-facing all-glass window wall.

To brake, I had to basically put both feet (wearing Vans™-type tennis shoes) on the floor and stand up while leaning on the arms of the office chair. Between the weight of the motor unit and my weight on the shoes and floor, I was able to slow it from full speed to stopped in about 20 feet, give or take.

Top speed was probably approaching 10 miles per hour. Hard to say. The iPhone's GPS doesn't like steel and cinder block. Based on the feeling, how fast steel columns were flying past me, and the amount of work required to stop it, it was at least in that range.

It was an awesome run at high-speed. These ponies have only been able to get to about half speed around the office and people and the office furniture.

DIY Workshop Stereo Boombox Kinda Thing

A car stereo, some extra car stereo speakers, some hardwood, and a ATX power supply for a computer and SHAZAM! You get a garage stereo that can play your iPod, XM radio, CDs, and AM/FM radio. This project was easy and only a little tedious to make. It was fun and it sounds awesome. Plus, the little speakers I had in my garage cabinet are not the greatest, but they're not bad. With a 500 or 600 watt power supply, I can beef it up someday if I get the energy.

Adjustable Workbench Cigar Holder

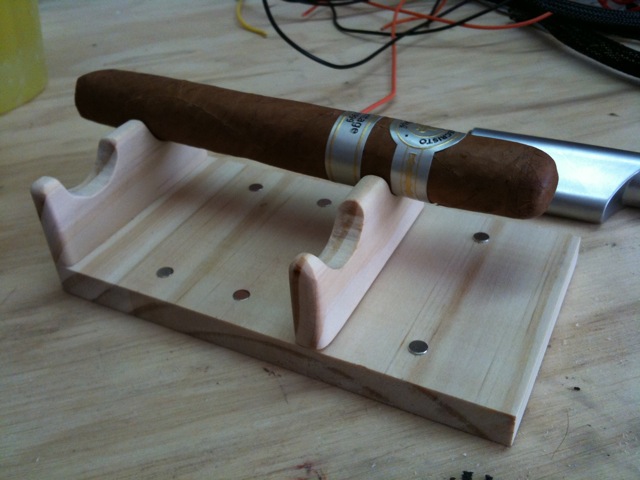
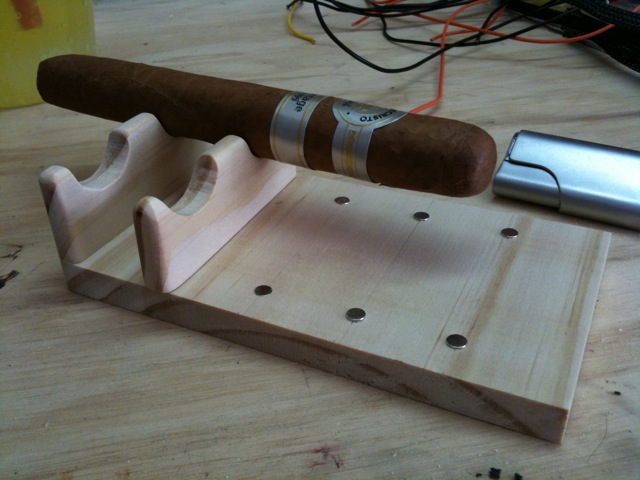
I usually put my burning cigars across the top of a ceramic mug on my workbench when I'm in the garage. The great thing about ceramic is that it's pretty much fireproof. What fun is that? The real problem, though, is that the cigars got short enough toward the end of smoking that they wouldn't fit across the mouth of the mug. So, I built an adjustable holder that IS flammable: Adjustable cigar holder complete with rare earth magnets

Super easy to build. A couple of pieces that sit veritcal, one that is permanently attached at the end of the base. The other has two magnets in the bottom that are attracted to the sets of magnets stuck into the base. As the cigar gets shorter, you simply slide the movable vertical thingie closer to the fixed one.

Adjust as needed for cigar length

Magnets are left over from the casino dice Rubik's cubes I made (see posts coming soon).

I had no plans. I just ran some extra pieces of pine through the band saw and drilled some holes for magnets and used Super Glue Gel to hold them in. Nothing to it. Hopefully, the cigar never burns down to the point where the hot end touches the wood on the holder. :)

Turn a Servo Into an Inexpensive Geared Motor

In my UME Mark II's (UME = "Useless Machine Ever"), originally I would program an Atmel AVR microcontroller to turn an RC servo forward and backward using timed pulses like you're supposed to. But, when you want to build many machines, microcontrollers are not the way to go. Simple polarity-changing circuits are the way to go. But, you still want the RPMs of a servo without the hassle of the pulsing control. So, you hack the servo and make it a geared motor. Easy! Here's how... Futaba S3004 servo intact

Grab yourself one o' them thar RC servos for a good price at your local hobby shop or on-line. They look so innocent. If you listen, they make a whimpering sound because they know that phillips head screwdriver in your hand is there for kicks.

Take off the armature thing.

I hope that my lack of knowledge in all that I do is entertaining and not a hinderance in the usefulness of these posts. :) So, that said, look at the above picture. I took off the star-shaped armature thingie.

Remove l-o-n-g screws holding the whole thing together.

Unscrew the screws in the bottom of the case of the servo-soon-to-be-geared-motor.

Take off the back. See neato circuitry.

Remove the cover on the bottom of the servo. You'll see nifty circuitry and the spots where the three wires are soldered to the board.

See the wonderful gears and pins and such

Carefully remove the top of the servo that contains the gears and pins and lubricating goo. I bold the word, "carefully" because you need to put this all back in the way it came out. If you can't get it all back together, you will have a nice pile of gears, pins, circuitry, a plastic case, some wire, and a neato DC motor. Take pictures if these don't cut mustard. They can help back track the destruction and make it reversible.

Shimmy the neato circuitry and motor guts out of the plastic case.

Shimmy the neato circuitry and motor guts out of the plastic case. The potentiometer (black thing standing on thick leads opposite the motor) is used by the circuitry to indicate where the shaft is positioned at any given moment. Once the hack is complete, it will be unused. I'll give you some options for it later on.

Desolder the three wires from the board.

I used my ACMG robot (aligator clip magnifying glass) to hold the guts while I worked. Desolder the three wires from the board. Remember not to heat the stuff you work on with the soldering iron for too long. That heat can travel to components that don't like warm weather and can cause severe rash or sunburn or death.

Solder the red and black wires to the motor leads.

Solder the red and black wires to the motor leads. Once you do this, the servo is simply an inexpensive geared motor. The robot makes this very easy to do. You can use a wife, girlfriend, son, daughter, or even an uncle to hold the work, but they're nowhere near as steady as a the alligator clips.

Route them between the pokey little component leads.

Wires soldered. Route them between the pokey little component leads sticking out of the bottom of the neato circuit board because there isn't much room between the PCB and the case cover and the wires have to travel across the board to the hole in the case. I like the path I chose. It looks like a... Well, it doesn't look like anything, but you can pretend.

Looking at the underside of the top of the servo

View of the servo... Er, almost-a-geared-motor (now) looking at the underside of the top of the servo (with the gears) and the top of the main body (at right). The bearings on the black gear are tiny and cool. That black gear has a little nub on it that acts as a stop at one of two positions 180 degrees from each other in the rotation of that shaft. We need that snipped off and trimmed.

See the nub? It's what I'm holding onto with the wire cutters.

See the nub? It's what I'm holding onto with the wire cutters. You need to trim that down flush with the shaft and with the face of the gear (the part of the gear parallel to the back side of the wire cutters in this photo). That will prevent the gear from stopping against the stops that are built into the case of the servo.

Make sure there are not bits left behind or you will hear clicking as those remnants click past the stops in the gear box.

Look on the right side of the gear, just below the bearings on the rear of the face of the gear. Make sure there are not bits left behind or you will hear clicking as those remnants click past the stops in the gear box. I suppose you could clip the stops, as well. But, you can see in this photo that I have a little bit of trimming to do, yet.

Use your new geared motor at will.

Use your new geared motor as you wish. I learned to circumvent the circuitry on these from various posts on the IntarWebs. It's not hard at all. If you screw up, the servos I found locally at the hobby shop were only about $12, so it isn't the end of the world if you fubar one. In the photo above, you can see the unfinished tops and "robotic arms" from one of the Useless Machines (see post on my site about this device).

Cigar Coolidor (Wine Cooler + Humidor = Coolidor)

This is one of the first "major" projects I built that involved electricity and electronics. This project makes it super-simple for me to manage my expensive (for me) cigar collection with minimal effort. It uses a 6-bottle wine fridge, some custom-cut Spanish cedar, and a Cigar Oasis XL electronic humidor humidifier. Completed coolidor

The fridge was about $99 on-line (I may have gotten it at Wal-mart's website, I can't remember). The Cigar Oasis was about $90 on-line. The Spanish cedar was the expensive part. I think I spent about $160 for a 6' piece of uncut and unfinished wood. I had to have the people at Woodworker's Source (Phoenix area, near my home) rip the big plank down to nice and thin planks with which I could line the fridge. The cutting part was about as much as the plank of cedar.

I kinda rushed this project, as you can see. The shelves are not completely level and don't fit perfectly. Most of my time was spent measuring and shaping the pieces so that they would fit without needing glue or fasteners. It turned out well enough to do the job.

The electronics weren't too tough. It was my first project that involved busting open a device that used wall power. That was unnerving. But, it isn't rocket science. I just opened up the back of the fridge, found where the power supply fed the electronics of the fridge at ~5V and tapped the power cord of the Cigar Oasis into that line. The Cigar Oasis doesn't draw a lot of power, so it seemed the power supply wouldn't mind. Er, at least, in the two or three years it's been running in my Man Cave™, it hasn't quit or caught fire. ;)

Like I just said, it's been running for about two or three years and I've filled the Cigar Oasis maybe twice. Other than that, I haven't touched the humidor for maintenance, only to select cigars to enjoy. The fridge keeps the temperature at 70 degrees fahrenheit and the Cigar Oasis keeps the humidity inside the fridge at about 70%.

Coolidor after 2 or 3 years

The photo above is the coolidor after about two or three years. I've loaded and unloaded lots o' cigars. The little readouts on the Cigar Oasis and the little electronic hygrometer don't ever match. The cigars smoke perfectly, so the "63%" showing on the gadget there is low because, when you open a humidor in Arizona, the humidity escapes rapidly... Because we're in a desert. But, when it reads about 65% upwards to %68, the cigars are happiest in my experience. To get the optimum humidity, I have to keep the Oasis set at about 68%.

This project is easy to do. If you're a cigar geek, I highly recommend taking a little time to build a humidor that can manage itself. Set and forget. It's awesome.

What happens when a fat guy on a golf cart parks on my iPhone?

Here is what a fat man on a golf cart (who apparently doesn't look in front of him while he drives) can do to your iPhone 3Gs that accidentally fell off your golf cart at the previous hole: Crushed iPhone

For those who have weak constitutions, turn away... Oops. Too late. Sorry.

Short story: One day I went golfing with my best friend. I used my iPhone 3Gs as a golf GPS. At the tee on hole number 3, it fell off our golf cart and landed face down on the side of the cart path. While we were playing the short game on hole 3 (up near the green), a fat guy in a hurry rolled up to the tee box and parked his fat ass and his golf cart on top of my iPhone. The end.

$199 later at the local Apple Store, I had a brand-spanking new iPhone 3Gs with not a single scratch on it. Yay (kinda)!